Do you wanna know What is Convolutional Neural Network?, It’s Different steps, and how it works. Then Give your few minutes to this blog, to understand What is Convolutional Neural Network? completely in a super-easy way.
Hello, & Welcome!
In this blog, I am gonna tell you-
- What is Convolutional Neural Network?
- How Convolutional Neural Network Recognizes the Features?
- Steps in Convolutional Neural Network.
- Convolution Operation.
- ReLU Layer.
- Pooling.
- Flattening.
- Full Connection.
So without wasting your time, let’s get started-
What is Convolutional Neural Network?
Convolutional Neural Network is an algorithm of Deep Learning. That is used for Image Recognition and in Natural Language Processing. Convolutional Neural Network (CNN) takes an image to identify its features and predict it.
Suppose, when you see some image of Dog, your brain focuses on certain features of dog to identify. These features may be dog’s ears, eyes, or it may be anything else. Based on these features your brain gives you signal that this is a dog.
Similarly, Convolutional Neural Network processes the image and identifies it based on certain features. Convolutional Neural Network is gaining so much popularity over the artificial neural networks. Because it is used mostly in every field like self-driven cars, Image recognition. Another application of a convolutional neural network is that on Facebook, it easily identifies the face of the person and tag them by their names.
Yann Lecun is the father of the Convolutional Neural Network. He is the student of Geoffrey Hilton. Geoffrey Hilton is the father of Artificial Neural Network.
So let’s see how CNN works-
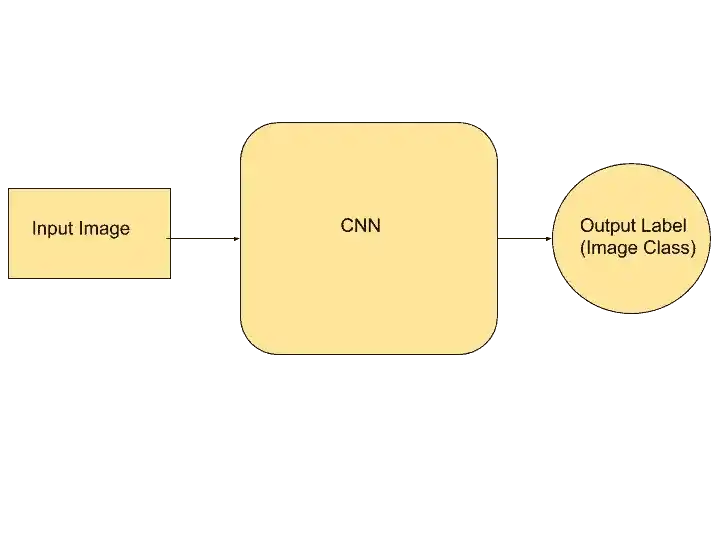
So, this is the basic structure of the Convolutional Neural Network. This input image may be anything, CNN takes this image to perform the operation and then classify it.
Convolutional Neural Network can be used in Sentiment Analysis. That means it can detect that person is happy or sad based on the feature of the images.
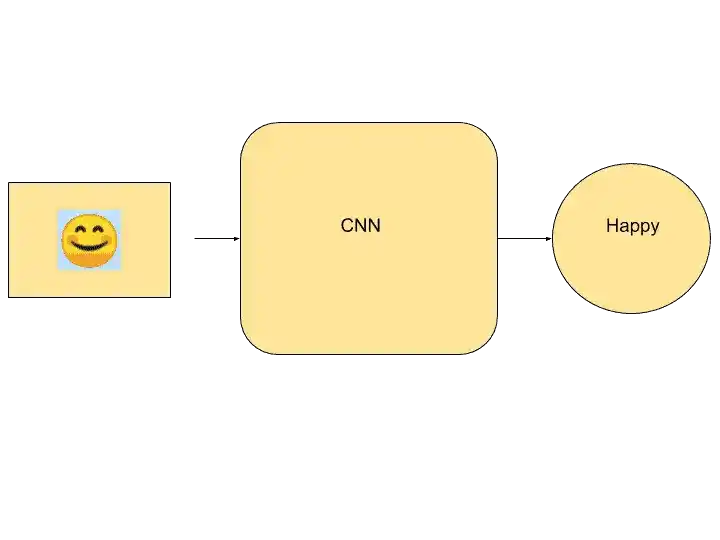
This is emoticon just for a reference, but CNN can identify the emotions of human faces. CNN gives the probability for example it can say 90% is the probability that the person is happy.
How Convolutional Neural Network Recognizes the Features?
The black and white image is 2- dimensional array. For Black and White image, the pixel range from 0 to 255. The 0 pixel is a black pixel and 255 is the exact white pixel. And between 0 to 255 there are different variations of grey color. Based on that information, computer works. This is the starting point in CNN to work on an image.
A computer doesn’t work on colors, it works on 0 and 1-pixel values.
In the colored image, it is a 3-dimension array. It has an RGB layer. RGB means Red, Green, and Blue. Each pixel has different values assigned to it. And again computer works on that values to find out the color of the image.
Let’s take a very simple example so that you can understand easily. Suppose we have a smiling Face. So to convert it into a pixel form, consider 0 as white, and 1 as black. The smiling image can be represented in the pixel format, that looks something like that-
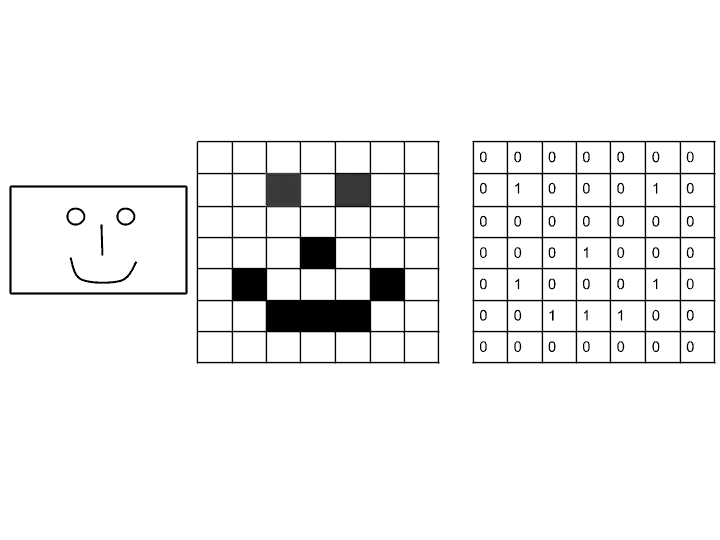
I will teach you the full steps of Convolutional Neural Network with these pixel values of smiling faces.
Now, let’s move to the steps of CNN.
Steps in Convolutional Neural Network-
In Convolutional Neural Network, there are basically following steps-
- Convolution Operation.
- ReLU Layer.
- Pooling.
- Flattening.
- Full Connection.
Convolution Operation-
A Convolution is basically a combining integration of two functions. And it shows how one function modifies the shape of others. But here I am not gonna discuss the maths behind it. I will discuss the functionality of the Convolution layer.
It’s very easy and interesting.
So let’s see what happens in the Convolution Layer.
In the convolution layer, we have a feature detector or you can say a Filter. This feature detector is a matrix. This matrix maybe 3×3 or 5×5. Here, I am taking a 3×3 matrix. You see mostly a 3×3 matrix.
A feature detector is also known as Kernel. A feature detector basically performs a multiplication of input image and generates a Feature Map.
You can understand the functionality of convolution with the help of this image.

So, here in the image, there is an input image matrix, feature detector, and feature map. This feature detector that I used here is just for your reference. It may be anything.
In the convolution layer, multiplication is done between the input image and the feature detector/filter.
As the filter is 3×3 matrix, so in input image choose the top left 3×3 matrix to perform multiplication.
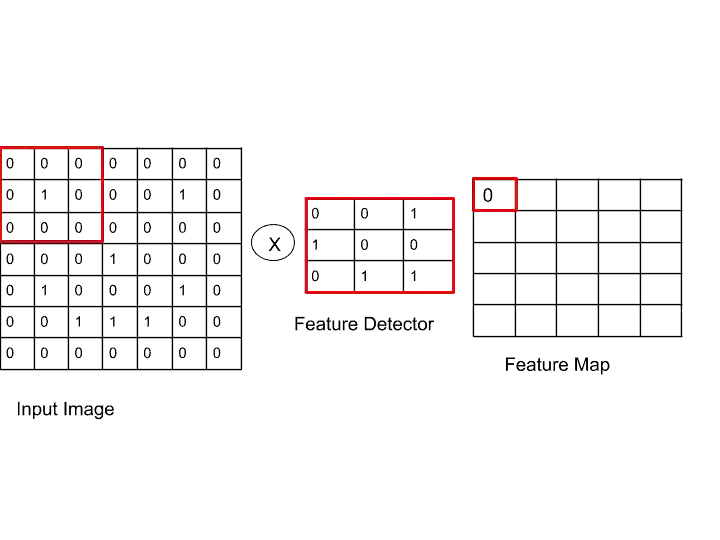
So, here we take the top-left 3×3 matrix from the input layer, and then we match values from feature detector, here nothing is matched, that’s why I write 0 in a feature map. How many features are matched, we write that number in the feature map.
Let’s see how we get 0 in feature map and how matching is done with help of this image-
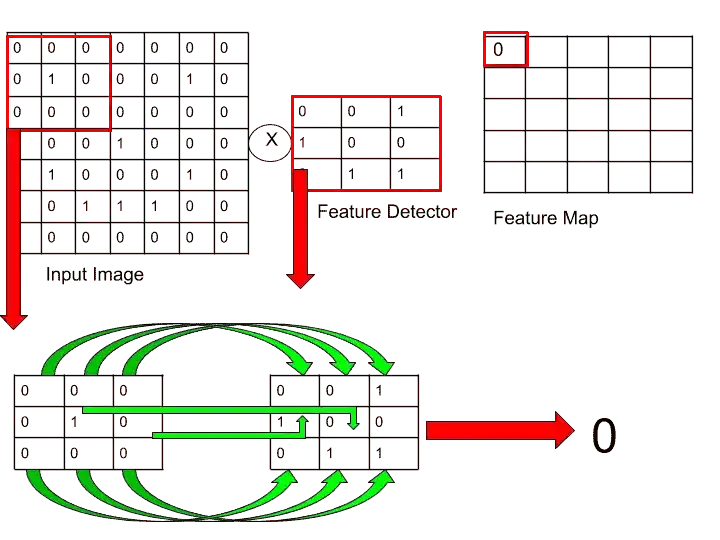
Here, in both the matrix, we didn’t get any 1 which is at the same location in both matrices.
Are you still confused that how we get 0 as a result?
Don’t worry!
I will explain to you again.
Here, we are trying to find the matching place of 1. When we find 1 which is located at the same place in both matrix, we count it as 1. Otherwise, we put 0 in a feature map.
I hope now you understand. Let’s see how to perform the same operation with other matrices.
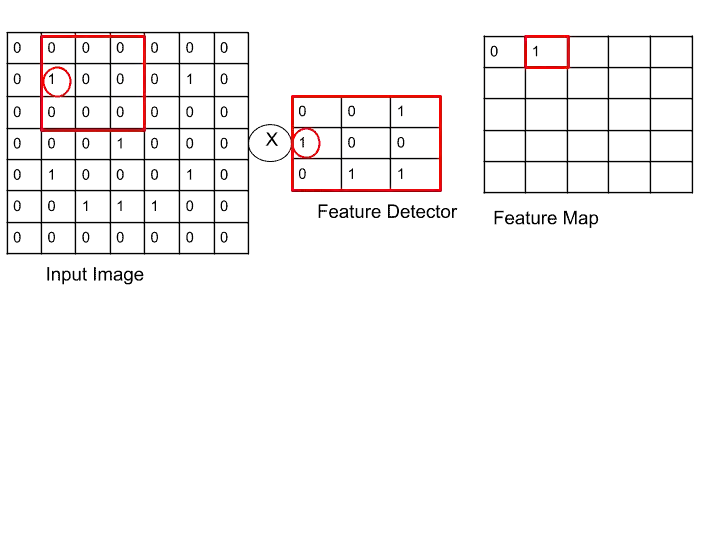
Here, we got 1 in the feature map, because we found one place where 1 is located at the same place in both matrices.
Similarly, it happens with all other matrices.
One more important thing to keep in mind is that here, we are using single step. That means the gap between the two pixels is one. It may be two or more.
So after performing the same operation on all pixels, we get our feature map that looks something like that.
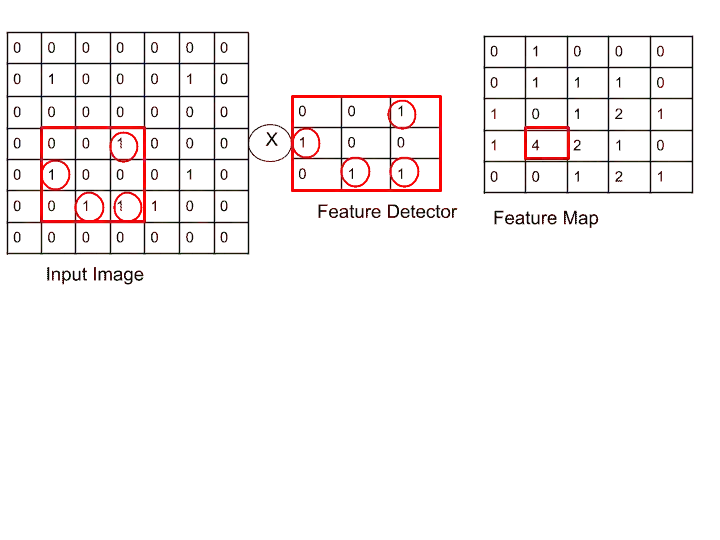
Here, I have mentioned the pixel, where we got 4 because we got 4 matching places, where 1 is located.
I hope now you understand how multiplication is performed in the Convolution Layer.
So, now what we have created in the Convolution layer?. Its a Feature map. By creating a feature map, we reduced the size of our image. Because our input image is of a 7×7 matrix, but after the convolution layer, we converted it into 5×5 matrix.
The main purpose of the convolution layer is to make the image into smaller in size so that we can perform operation faster.
But,
There is one more question, that are we losing the information? So the answer is- yes, some information we are losing, but the main features of the image, we have collected. In image all of the features are not important, some are useless. They can only increase the image size. So it’s better to remove such features.
The higher the number you get in the feature map, the more important feature it is. Like in the example image, we got 4. So it shows some important features of the image.
In CNN multiple feature maps are created for a single image with the help of different filters. Here, I have shown only one feature map, but it may be much more in CNN. Therefore, lots of features are collected from different feature maps.
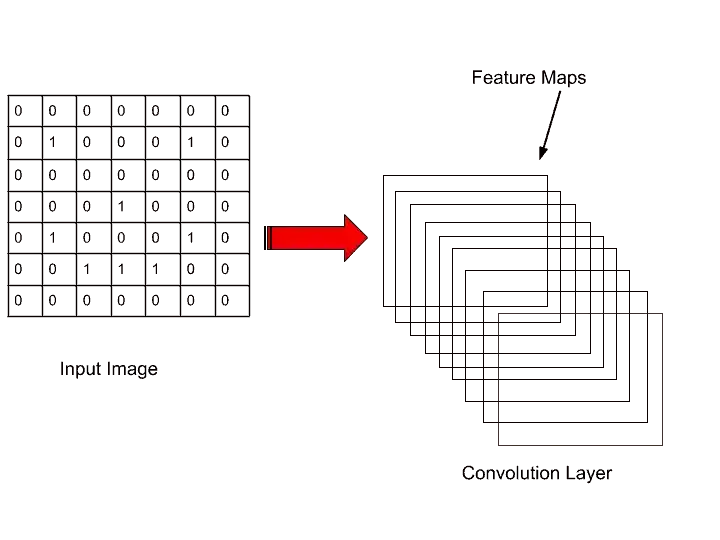
Different feature maps are collected, and then at the training time, the neural network decides, which features are important. We apply different feature detectors or filter to get different feature maps.
2. ReLU Layer-
This is the additional step in the convolution layer. Here, we apply a rectifier function. I hope you are familiar with the rectifier function. If not, then read it from here.
We apply the rectifier function here because we want to increase the nonlinearity in our CNN. The reason for increasing the nonlinearity in CNN because images are highly nonlinear. But when we apply different functions like convolution, so the image may become linear. Therefore, we want to break the linearity.
There is nothing much to discuss in that Layer. It is a subpart of the Convolution layer.
Let’s move to the next layer.
3. Pooling-
Suppose CNN has to identify the apple. But all apple images are not the same. Some have different shapes, some have different colors, so how CNN can recognize every image of an apple. If CNN looks only those features from those it learned previously, so it can’t predict the new shape apple. Therefore we have to make sure that our neural network has a property called special variance. That means it doesn’t care that features are a little bit different, still, CNN can recognize that it is an apple. That is all about Pooling is used.
Here, I am gonna use Max Pooling. But there are a different kind of pooling- Min Pooling, Sum Pooling, and many more.
Now let’s see how to apply Max Pooling-
- We take a box of 2×2 pixels from the feature map. You can choose a 3×3 pixel of the box. It’s not fixed.
- Start from the top left corner of the feature map.
- As, we are doing max pooling, so we take the max number from that box and put it into Pooled Feature Map.
- Then move to the next box with one step and perform the same operation.
Now, let’s understand with the help of this image-
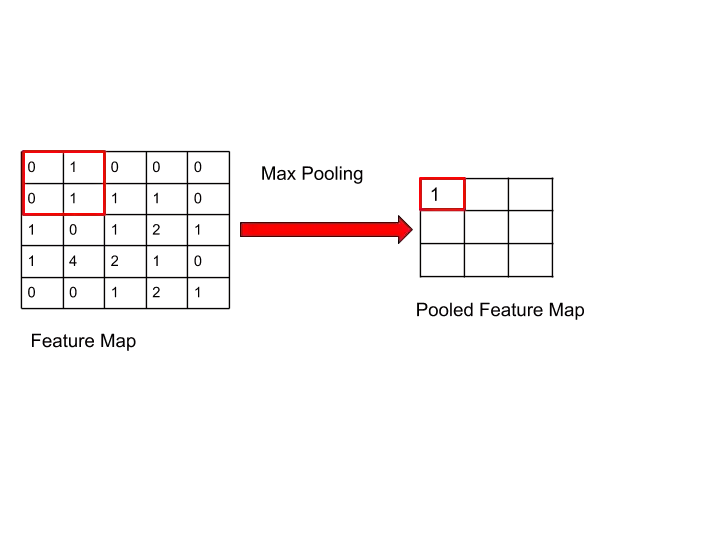
Here, we got 1 because the maximum number is 1 in the box of 2×2 pixels.
Let’s see the next step-
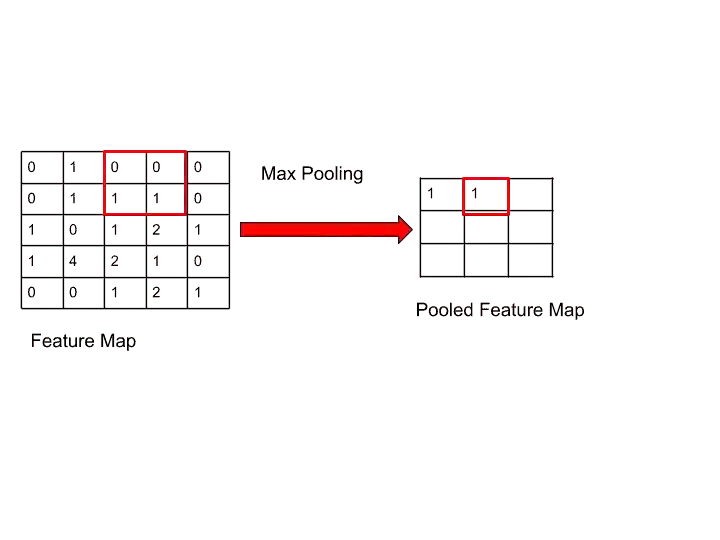
Step 3-
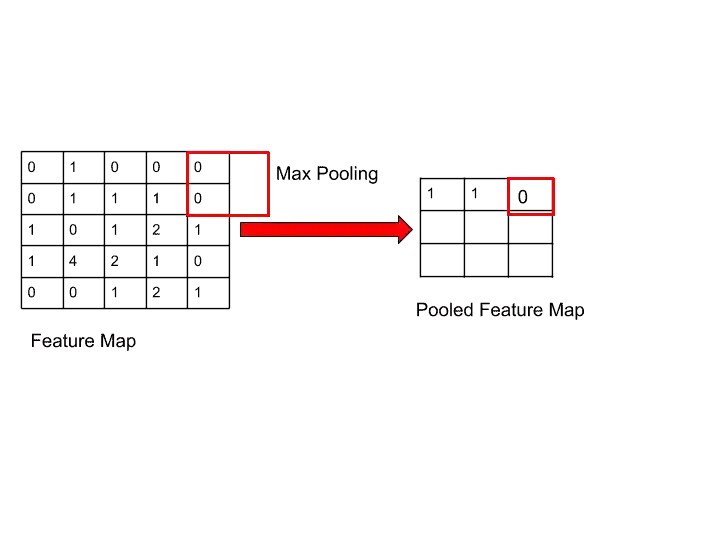
Step 4-
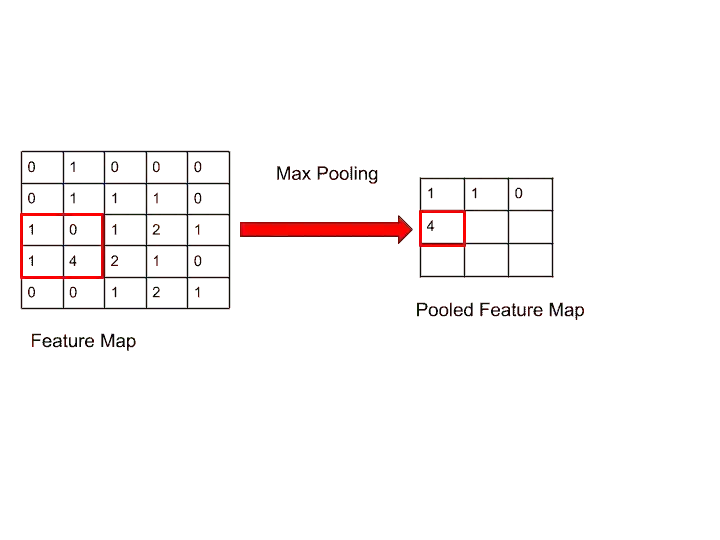
Here, we got 4, because the maximum number in that box is 4.
Similarly, you can perform the same operation with the whole feature map. After performing on full feature map, you get your Pooled feature map something like that-
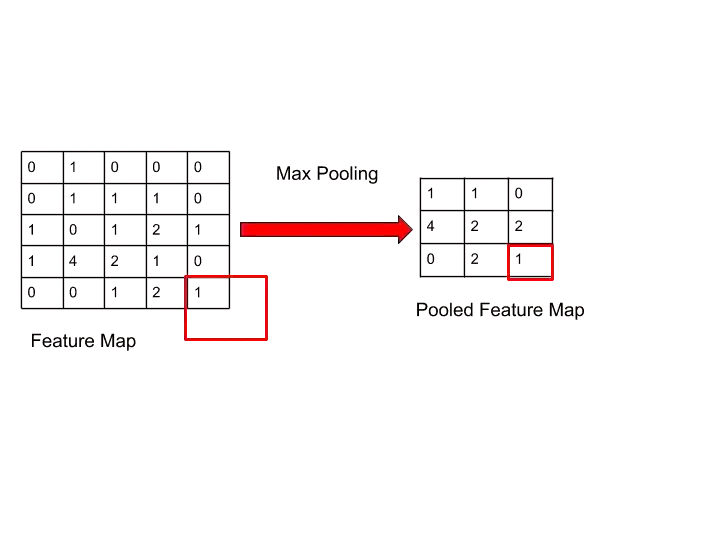
By performing Pooling, we are reducing the size but also preserving the important features of the image. We are preventing overfitting by performing pooling. And that is the main advantage of pooling. Because not all information is important.
So, that’s all about pooling. Now let’s move to the next step.
4. Flattening-
This is a very simple step. After Pooling, we got out Pooled Feature Map. So, in this step, we are going to convert a 3×3 matrix into a single column.
The reason for doing flattening is because we will provide these values as input values in the input layer.
Let’s see how it looks after performing flattening-
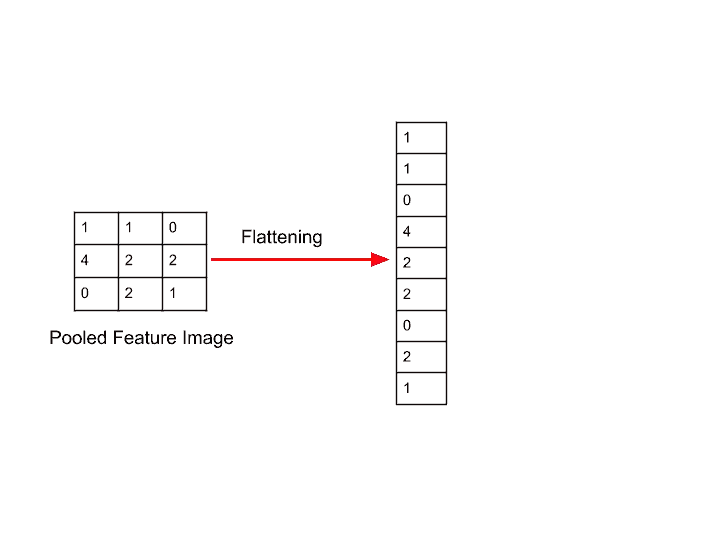
So, after flattening, we got pixels values in this form. And these will be supplied to the input layer.
Now, let’s move to the final step-
5. Full Connection-
In that step, we add our full convolutional network to the artificial neural network. All the work which we have done so far, now its time to pass these pixel values to the neural network.
I have discussed about the artificial neural network in a separate article. If you are not aware of the artificial neural network and its structure, then first read this article from here- Artificial Neural Network.
So, in an artificial neural network, we have an input layer, a hidden layer, and output layer, something like that-
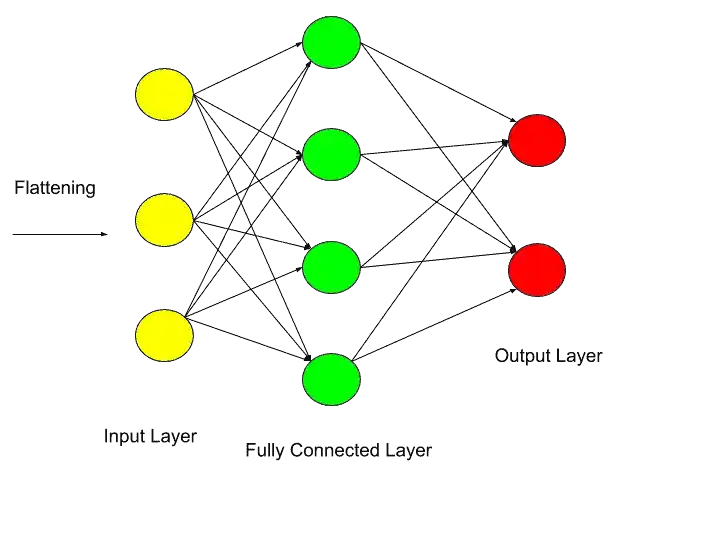
In, CNN the hidden layers are called a fully connected layer.
So, now we pass our flattening values to the input layer, and fully connected layer perform operations and predict the outcome based on the features.
Let’s understand what operation is performed here-
- First, we pass input values to the input layer.
- A fully connected layer performs an operation, and predict the output.
- Then it checks for the error rate in the output layer with the help of cost function as we did in artificial neural networks.
- After that, we backpropagate and adjust the weights, and again predict the output.
- Then again the predicted output is matched with actual output and calculates the error rate.
- Again backpropagate, update the weights.
- This process is repeated until CNN predicts the accurate result.
Read this article to understand the full working of Neural Network.
So that’s all about Convolutional Neural Network.
I hope now you understand What is Convolutional Neural Network? and its steps. If you have any questions, feel free to ask me in the comment section.
Enjoy Learning!
All the Best!
Read Stochastic Gradient Descent from here- Stochastic Gradient Descent- A Super Easy Complete Guide!
Thank YOU!
Though of the Day…
‘ It’s what you learn after you know it all that counts.’
– John Wooden
Read Deep Learning Basics here.
Written By Aqsa Zafar
Founder of MLTUT, Machine Learning Ph.D. scholar at Dayananda Sagar University. Research on social media depression detection. Create tutorials on ML and data science for diverse applications. Passionate about sharing knowledge through website and social media.

Nice work keep it up
Thank You!
Thanks for your clear explanations. Great work.
Glad that you liked my Article!